- Kubernetes on QingCloud AppCenter User Guide
- Abstract
- Prerequisites
- Create Kubernetes cluster
- Test Kubernetes
- Scale horizontal/vertical
- Kubernetes integrates with QingCloud IaaS
- Tutorial
- Note
- FAQ
- How to visit services from outside of Kubernetes cluster
- Why my cluster fails to startup or gets timeout
- Why LoadBalancer doesn’t work properly
- How to output my application logs in json format and be indexed by Elasticsearch in terms of fields
- How to customize the logs in Kubernetes
- Why log can’t be collected
- How to use private registry
- Change History
Kubernetes on QingCloud AppCenter User Guide
Abstract
Kubernetes is an open-source orchestration system to provide a platform for automating deployment, scaling, and operations of containerized applications across clusters of hosts. The goal of Kubernetes on QingCloud AppCenter is to help end users easily set up a Kubernetes cluster in several minutes. It also supports cluster horizontal/vertical scaling, node monitoring and alarming etc. In addition, the cluster is integrated with QingCloud storage, network and load balancer and so on. In another words, Kubernetes on QingCloud ensures end users data security and provides high disk/network I/O performance as well.
Prerequisites
To ensure high security, Kubernetes cluster must run in a private network, so creating a VPC and managed vxnets is necessary before creating Kubernetes cluster. Also join the vxnets to the VPC and enable DHCP service (enabled by default).
Create an EIP
Since the Kubernetes you are going to create must be accessible to internet, you need to create an EIP first. Please go to Networks & CDN -> Elastic EIPs, click ‘Create’ button.
Create VxNets
Go to Networks & CDN -> VxNets, click ‘Create’ button.

You need to create two kinds of VxNet, one of which is for Kubernetes cluster itself called ‘cluster vxnet’. The other one is called ‘Pod vxnets’ which are for applications deployed onto the cluster. You might create multiple Pod vxnets since one VxNet only supports 253 private IPs (Pods).
Create a VPC
As shown below, through the left navigation tree on QingCloud console, go to Networks & CDN -> VPC Networks, click ‘Create VPC Network’ button. Please don’t specify VPC Network Range to 172.17.0.0/16, which is used by docker by default.

Join VxNets to VPC
Once you created the VxNets and the VPC, you need to join the VxNets to the VPC through one of the following ways.
- Please go back to the page of
VPC Networks, click the VPC into its detailed page. In this page, associate the EIP you created above with it, and join the created VxNets including cluster VxNet and Pod VxNets to it.

Note: After all settings are saved, please make sure to click ‘Apply Changes’ button on top right of the page.
- Please go back to the page of
VxNets, right click it, then select ‘Join VPC Network’ and choose the VPC you created to join.

Create API Access Key
Your Kubernetes cluster will manage your resource from QingCloud platform, so API access key is required by the Kubernetes in terms of security. Please go to Access Keys page through left navigation tree, click ‘Create’ button, then input the name and description of the key and click ‘Submit’ button, a popup panel of generated key will be shown and download this key file to your local machine, and then you could get the detailed content of this key.

Create Kubernetes cluster
After all prerequisites described above are created, you are ready to create Kubernetes.
Please go to Kubernetes on QingCloud AppCenter, click ‘Deploy on QingCloud’ button and select specific zone, and input the cluster info such as name, description, version, Two pre-defined resource groups are provided, the basic resource group sets all nodes as high performance type, the prenium group sets all nodes as super high performance type except client node, also you could customize all nodes’ CPU/Memory, how many nodes (nodes count) etc based on your own requirement. Worker Nodes of high performance will be marked with ‘node’ node label, worker nodes of super high performance will be marked with ‘ssd_node’ node label. Our volume plugin will create volume based on master node, so any pod with volume mounted should be scheduled to the worker node which type is same as master node.
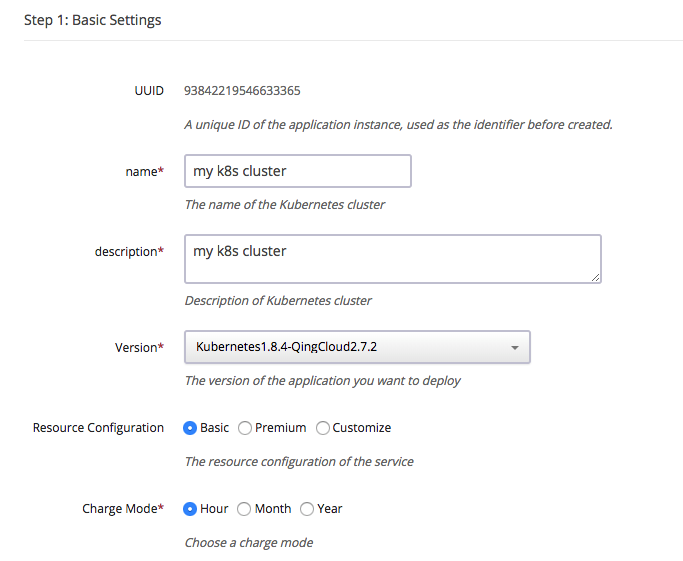

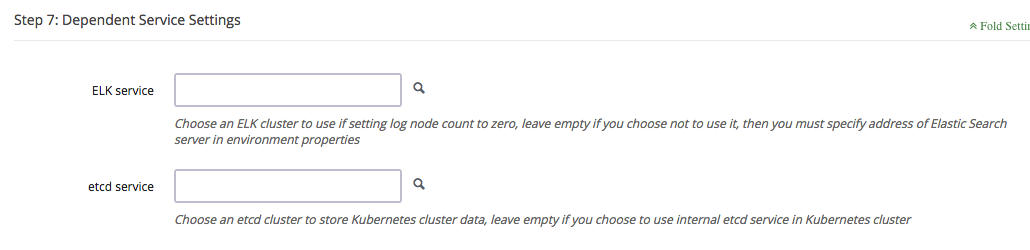
Please add exteranl ELK app in step 7 or specify Elastic Search server address in environment setting if setting log node count to zero.

Choose the cluster VxNet for the Kubernetes. Note: choose cluster VxNet, not Pod VxNet.

EFK service is deployed on log nodes to collect and manage log data, you could also choose to rely on ELK App on QingCloud outside of Kubernetes cluster.
Note: log node count should be zero, ELK cluster should be deployed at first and located in same VPC network as Kubernetes cluster.
Kubernetes uses etcd service deployed on master node to store cluster data as default, you could also choose to rely on etcd on QingCloud to do that, which will bring lower data loss risk.
Note: etcd cluster should be deployed at first and located in same VPC network as Kubernetes cluster.
Specify other parameters for Kubernetes cluster. The following are some of the important parameters you need to be aware of.

-
Kubernetes on QingCloud AppCenter integrates with QingCloud IaaS platform and could manage resource such as volume, VxNet etc. From the aspect of security, end user needs to use her/his own API access key to call QingCloud IaaS API Access Key.
-
Each working node is limited to support 60 runningn pods as default, configure max-pods to increate this quota. If choosing hostnic network, please set this parameter to 60 because hostnic network has a limitation that only 64 nic could be attached to one instance.
-
The Kubernetes cluster uses QingCloud SDN (software defined network) to provide network for Pods. Every pod will be bound with a NIC and assigned with a private IP address. End user should create vxnets in advance and input the vxnet IDs starting with vxnet- to the parameter ‘Pod vxnets’. The Pod vxnets are recommended to be only used for Pods in this Kubernetes cluster. Each vxnet contains up to 253 IP addresses, so create multiple vxnets if you have large amount of Pods. Please separate them by blank character in the Environment Settings. Please don’t include cluster vxnet in the Environment Settings. Also all these Pod vxnets should be in the same VPC as the cluster vxnet.
The following parameters are optional.

- Configure the domain name for Kubernetes API, which is used to generate ca certification of API server.
- Port range of each node: set port range for nodePort service.
- max pods: set how many pods could be run on each worker node.
- Choose calico network plugin as default, also provide flannel and hostnic as options. hostnic is the network plugin developed by QingCloud based on CNI specification, which bind NIC to poc directly under vxnet. Enable hostnic plugin for better network performance with a few limitations. hostnic plugin assigned a nic on host to container and the standalone nic would provide better performance. But the total number of nics that are available on single host is up to 64. So the total number of pod on host can not exceed 64. if you choose to disable hostnic but use flannel, there would be no such limitation.
- Allow to configure docker bridge network.
- Registry mirrors: The mirror address for Docker hub registry, the default value is official docker hub mirror address for China.
- Insecure registries: The Kubernetes cluster supports private docker registry. To help end users using their own internal registry, QingCloud provides Harbor App, which is deployed within a few minutes. Specify corresponding IP address if the private registry doesn’t support https or doesn’t use 80 port(the format is ip:port).
- Private registry: specify the address of private docker registry, will bind the authenticaton data to docker runtime during cluster deployment, then end user could pull images directly from his own registry server. Make sure the private registry server locates in same VPC with Kubernetes cluster. If end user wants to use domain name to access it, please add corresponding dns data through VPC -> DNS Service, then deploy Kubernetes cluster.
-
Username & Password of docker registry: The Kubernetes cluster needs to pull necessary images from dockerhub.qingcloud.com or some private docker registry server, so end user needs to input user name and password for authentication. The cluster already binds guest account to pull images on public repositories from dockerhub.qingcloud.com. Please go to QingCloud console,
Container Platform -> Docker Hubto manage your own repositories if choosing to use QingCloud dockerhub. - The Kubernetes cluster supports the feature of customizing log monitor. End user can search and query all the log resource managed by the Kubernetes. The log will be deleted on a scheduled time to save disk space. It is configurable by the cluster parameter ‘Keep log days’.
- Kubernetes log level: Set the log level of Kubernetes cluster. You can view log through Kibana console.

- Fluent forward server: Specify fluentd server address if end user wants to use her/his own log server.
- Elastic Search server: Specify Elastic Search server address if end user wants to use her/his own ES service, the format is ip:port, make sure the ip and port are accessible.
- Enable Istio: Istio is an experimental function to connect, manage and secure microservices. We do not recommend you to enable it in production environment before an stable version of istio is released, which can guarantee the quality and performance. Currently we use Istio 0.7.1 without Istio-Initializer, and istioctl has been deployed on client node. More details seeIstio.
- Enable Helm: Enable Helm(2.8.2) to provide package management utility for cluster, which is deployed ad default after Kubernetes 1.10.5-QingCloud2.8.0. Helm is an open source package manager for kubernetes, which could be used to install kubernetes applications.
Complete Deployment
After deploying Kubernetes cluster, end user may check every node’s status in the detailed page of the cluster. ‘Healthy’ under ‘Service status’ means this node starts successfully. Cluster’s status will become to ‘Active’ after every node becomes healthy, which means end user can use Kubernetes services now.
Test Kubernetes
Log in the cluster
In order to avoid operation trouble, we only open client node to end user currently which pre-configured everything for user to manage the cluster. Please click ‘vnc’ icon on client node as shown below.

Log in as root/k8s and run commands as below:
# kubectl get pods --all-namespaces
which returns all Pods with status to show if the cluster runs normally.
Also you could use ssh to access other working nodes without password through client node, so we strongly suggest you to change default password of client node once cluster is created.
# kubectl get service --all-namespaces

NAMESPACE     NAME                    CLUSTER-IP      EXTERNAL-IP   PORT(S)         AGE
default       kubernetes              10.96.0.1       <none>        443/TCP         1m
kube-system   elasticsearch-logging   10.96.0.11      <none>        9200/TCP        1m
kube-system   fluentbit-logging       10.96.195.104   <none>        24224/TCP       1m
kube-system   heapster                10.96.132.130   <none>        80/TCP          1m
kube-system   kibana-logging          10.96.18.90     <none>        5601/TCP        1m
kube-system   kube-dns                10.96.0.10      <none>        53/UDP,53/TCP   1m
kube-system   kubernetes-dashboard    10.96.70.70     <none>        80/TCP          1m
which returns all services with status. These services are accessable by cluster-ip or service name.
# curl 10.96.0.11:9200/_cluster/health
# curl elasticsearch-logging.kube-system:9200/_cluster/health
On client node, the default DNS search domain is default.svc.cluster.local svc.cluster.local cluster.local. Therefore, to access the services from non default namespace, end user should add namespace suffix. For more details about Kubernetes DNS support, please refer to Kubernetes Official Document about DNS Pods and Services.
Check cluster status through browser
Kubernetes cluster on QingCloud integates heapster and dashboard components provided by Kubernetes and an elasticsearch kibana cluster. End user can check monitor and log data easily via those components.
Log in client node and run command as below:
# nohup kubectl proxy --address='0.0.0.0' --accept-hosts='.*' --disable-filter=true --accept-paths="^.*" &
You also can enable VPN service of VPC and connect this VPN through VPN client, then open the URL on browser:
http://<client node ip>:8001/ui (Kubernetes 1.8.4-QingCloud2.7.3 and lower versions)
http://<client node ip>:8001/api/v1/namespaces/kube-system/services/http:kubernetes-dashboard:/proxy/#!/overview?namespace=default (Kubernetes 1.10.5-QingCloud2.8.1 and higher versions)
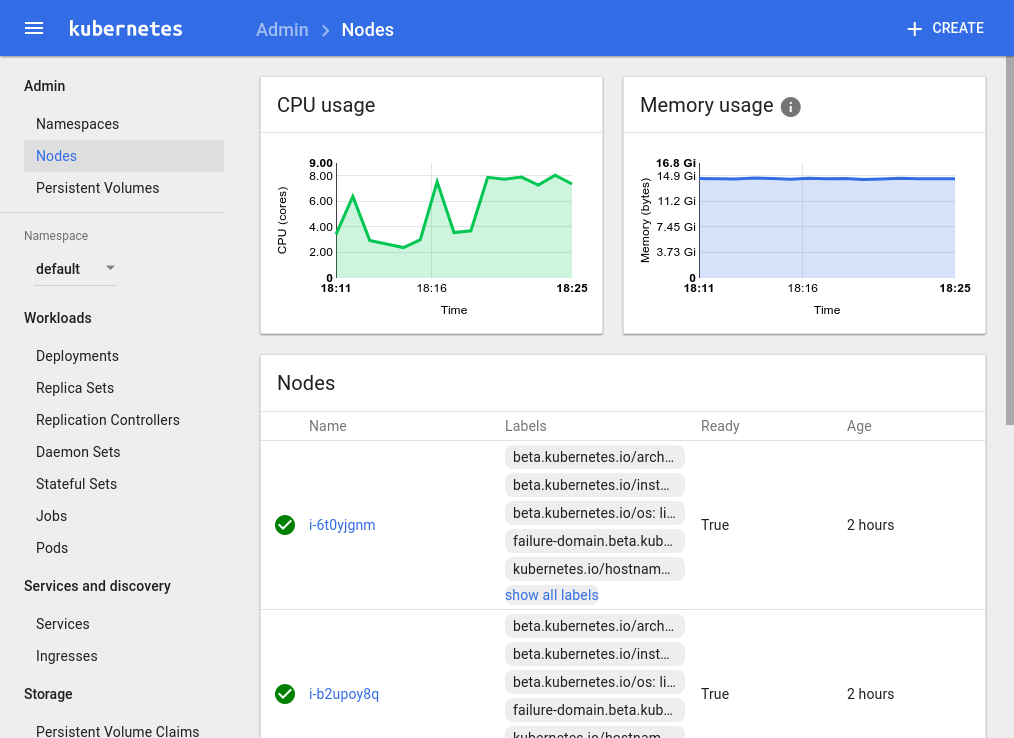
The dashboard console is as below:
You can visit Kibana console for log management at:
http://<client node ip>:8001/api/v1/proxy/namespaces/kube-system/services/kibana-logging/ (Kubernetes 1.8.4-QingCloud2.7.3 and lower versions)
http://<client node ip>:8001/api/v1/namespaces/kube-system/services/http:kibana-logging:/proxy/#!/overview?namespace=kube-system(Kubernetes 1.10.5-QingCloud2.8.1 and higher version)
End user could find out proxy address for other service by running the command below:
# kubectl cluster-info
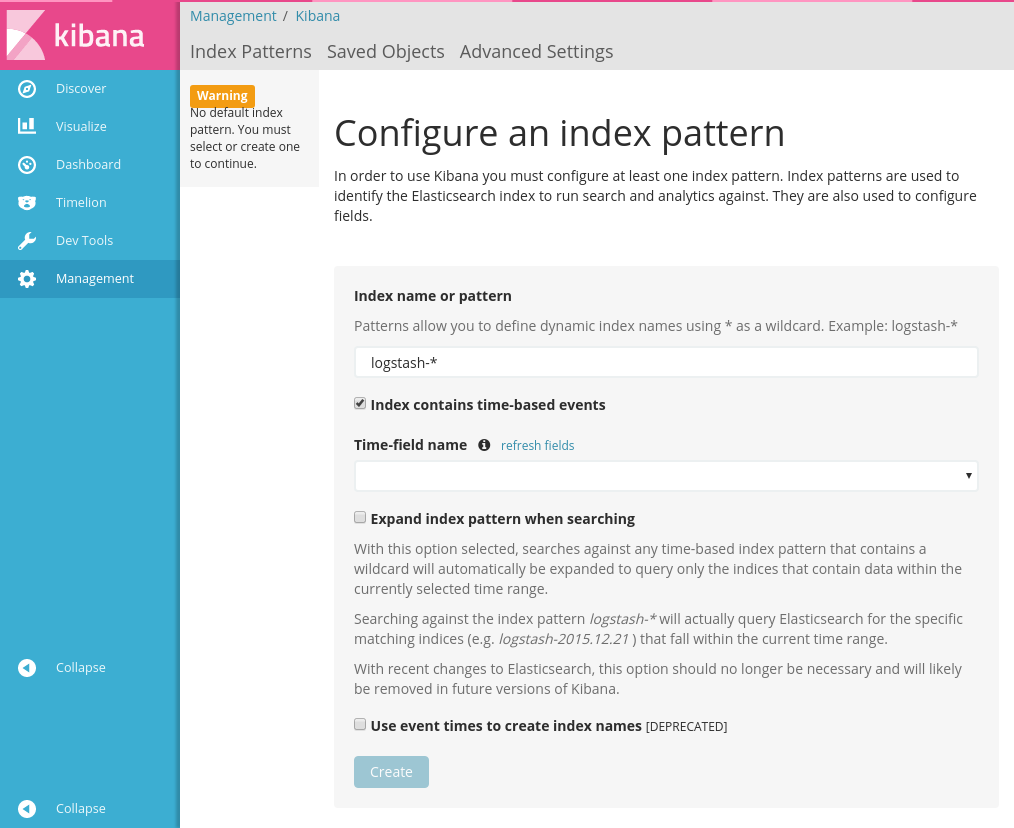
End user needs to import the following indexes on Kibana console to get corresponding log data. All these data is based on timestamp. So input the index name with pattern and timestamp then select field name through drop-down list.
| index | timestamp |
|---|---|
| heapster-cpu-* | CpuMetricsTimestamp |
| heapster-memory-* | MemoryMetricsTimestamp |
| heapster-filesystem-* | FilesystemMetricsTimestamp |
| heapster-network-* | NetworkMetricsTimestamp |
| logstash-* | @timestamp |
For details please refer to the Official Document.
To get the data structure of heapster, please visit http://<client node ip>:8001/api/v1/proxy/namespaces/kube-system/services/elasticsearch-logging/_cat/indices
Some pre-defined templates are provided by QingCloud, which could be downloaded from here.
The main timeline query is as follows.
.es(index='heapster-cpu-*',q="MetricsTags.type:node",split='MetricsTags.host_id:10',timefield='CpuMetricsTimestamp',kibana=true,metric="max:Metrics.cpu/node_utilization.value")
heapster-cpu- is the alias name of heapster-, which could be identified by adding _type.
MetricsTags.type:node is the tag for different types of instances, like pod, node…etc.
End user could find out the data under same type at first then build up query based on requirement and charts.
Kubernetes Cluster Monitoring and Application Monitoring
The monitoring integrates with prometheus. The Service using for serving prometheus dashboard is defined as NodePort type. You can access the prometheus web portal with 30,000 ports on any node except the client node. For example, you can visit http://<master node IP>:30000/.
Prometheus can automatically discover targets that need to collect data through its own Kubernetes service discovery mechanism. You can see the discovered target on the web interface. As shown below.

Each target provides monitoring data in the exposition format defined by prometheus. Please refer to official website for exposition format.
By collecting the monitoring data provided by the target, prometheus provides a dashboard for you to draw a graph. Click the “Graph” button on the menu, enter the drawing interface, as shown below.

For example, we can enter the following expression to see the memory usage of the container started by prometheus, as shown below.
`prome
container_memory_usage_bytes {pod_name = "prometheus-0", container_name = "prometheus"}
`

For more prometheus expression rules, please refer to official documentation.
Kubernetes package manager: Helm
Helm is available for use when the cluster initialization is complete, if Enable_Helm is set to ‘yes’. The Default helm repository is hosted on Google Cloud Bucket which is not accessible in Mainland China. So we hosted a helm repo on Qingcloud and you can add following repos to helm repo list. And gcr.io is not accessible in Mainland China. If images on gcr.io is refered in charts, deployments will not be successful. Please make sure the cluster has access to public internet before you enable helm.
| Repository | url |
| stable | https://helm-chart-repo.pek3a.qingstor.com/kubernetes-charts/ |
| incubator | https://helm-chart-repo.pek3a.qingstor.com/kubernetes-charts-incubator/ |
| svc-catalog-charts | https://helm-chart-repo.pek3a.qingstor.com/svc-catalog-charts/ |
make sure helm and tiller are installed.
$ helm version
Client: &version.Version{SemVer:"v2.0.0-alpha.4", GitCommit:"db...", GitTreeState:"dirty"}
Server: &version.Version{SemVer:"v2.0.0-alpha.4", GitCommit:"a5...", GitTreeState:"dirty"}
You can see which repositories are configured using helm repo list:
$ helm repo list
NAME           	URL
stable         	https://helm-chart-repo.pek3a.qingstor.com/kubernetes-charts/
local          	http://localhost:8879/charts
make sure your Helm client is up to date by running helm repo update
$ helm repo update
search available charts
$ helm search
NAME                 	VERSION 	DESCRIPTION
stable/drupal   	0.3.2   	One of the most versatile open source content m...
stable/jenkins  	0.1.0   	A Jenkins Helm chart for Kubernetes.
stable/mariadb  	0.5.1   	Chart for MariaDB
stable/mysql    	0.1.0   	Chart for MySQL
install charts, take mysql as example
$ helm install stable/mysql
Released smiling-penguin
get the status of release
$ helm ls
NAME             VERSION   UPDATED                   STATUS    CHART
smiling-penguin  1         Wed Sep 28 12:59:46 2016  DEPLOYED  mysql-0.1.0
delete release
$ helm delete smiling-penguin
Removed smiling-penguin
Scale horizontal/vertical
Add Node
Click ‘Add Nodes’ button when workload becomes heavy such as more and more services are deployed in Kubernetes cluster. The newly added node’s status could be found in cluster detailed page.
Delete Node
Click ‘Delete’ button to remove unnecessary nodes when the workload is down to low level, which saves cost for end user.
Scale Up/Down (Resize cluster)
User also can resize (i.e., scale up or down) cluster to change the cluster workload capacity.

Adjust the capacity for different roles’ nodes on the pop-up page.

Kubernetes integrates with QingCloud IaaS
Kubernetes on QingCloud integrates its internal services with the services from QingCloud IaaS platform such as load balancer, storage, network etc.
LoadBalancer
The Kubernetes supports to integrate its internal services with loadbalancer from QingCloud IaaS. These services are accessible from outside of the cluster through loadbalancer.
When compose service in your yaml file, set service type to LoadBalancer, then add the following annotations in metadata section:
- service.beta.kubernetes.io/qingcloud-load-balancer-type: This annotation will set the loadbalancer type, which corresponds to the loadbalancer_type attribute of QingCloud IaaS API create_loadbalancer.
- service.beta.kubernetes.io/qingcloud-load-balancer-eip-ids: This annotation will bind eips to loadbalancer (these eips should be created on QingCloud console at first and not used by other services), then input their ID for this annotation, which supports up to four EIPs. With this annotation, the loadbalancer of Intenet type will be created automactically.
- service.beta.kubernetes.io/qingcloud-load-balancer-vxnet-id: This annotation will assign created loadbalancer of vxnet type to some vxnet (This vxnet should be created on QingCloud console at first).
As described above, specifying annotation as qingcloud-load-balancer-eip-ids or qingcloud-load-balancer-vxnet-id will create loadbalancer with Internet or vxnet type. If just specifying LoadBalancer service type but not set any annotations or no more detailed attributes under annotations spec, a loadbalancer with vxnet type will be created and assigned to the vxnet where Kubernetes cluster resides in.
The example is as follows.
apiVersion: v1
kind: Service
metadata:
  name: helloworld
  annotations:
    service.beta.kubernetes.io/qingcloud-load-balancer-eip-ids: "eip-xxxx"
    service.beta.kubernetes.io/qingcloud-load-balancer-type: "0"
spec:
  ports:
    - port: 80
      targetPort: 80
  selector:
    app: helloworld
  type: LoadBalancer
---
apiVersion: v1
kind: Service
metadata:
  name: helloworld-internal
spec:
  ports:
    - port: 80
      targetPort: 80
  selector:
    app: helloworld
  type: LoadBalancer
Please specify qingcloud-load-balancer-eip-ids when you are using public load balancer, or specify qingcloud-load-balancer-vxnet-id when using private load balancer. If neither qingcloud-load-balancer-eip-ids nor qingcloud-load-balancer-vxnet-id is specified, for instance, in the helloworld-internal service example above, a private loadbalancer will be created into to the vxnet where Kubernetes cluster is using, i.e., the cluster vxnet.
Check the service status through kubectl command below.
# kubectl get service

NAME                  CLUSTER-IP     EXTERNAL-IP     PORT(S)        AGE
helloworld            10.96.146.44   139.198.0.55    80:30760/TCP   3d
helloworld-internal   10.96.145.22   192.168.0.5     80:30221/TCP   3d
EXTERNAL-IP column will show the IP address of EIP for loadbalancer of Internet type and private IP address in vxnet for loadbalancer of vxnet type.
Please set name attribute if more than one ports are set in configuration file, otherwise service will fail to deploy because of specification validation error.
Storage
The Kubernetes cluster supports to attach QingCloud IaaS volumes to pod as PersistentVolume. These volumes will also be migrated to the nodes along with their pods which may be migrated for some reason.
Set qingCloudStore specification when defining PersistentVolume, which has two attributes:
- volumeID: the ID of the volume that is created on QingCloud console in advance.
- fsType: the type of file system after the volume is attached.
The example is as shown below.
kind: PersistentVolume
apiVersion: v1
metadata:
  name: qingcloud-pv
  labels:
    type: qingcloud
spec:
  capacity:
    storage: 10Gi
  accessModes:
    - ReadWriteOnce
  qingCloudStore:
        volumeID: vol-xxxxx
        fsType: ext4
Example for Pod of Kubernetes 1.5:
apiVersion: v1
kind: Pod
metadata:
  name: test-pd
spec:
  containers:
  - image: dockerhub.qingcloud.com/docker/nginx
    name: test-container
    volumeMounts:
    - name: html-volume
      mountPath: "/usr/share/nginx/html"
  volumes:
  - name: html-volume
    qingCloudStore:
      volumeID: vol-xxxxx
      fsType: ext4
Example for Pod of Kubernetes 1.7+:
apiVersion: v1
kind: Pod
metadata:
  name: test-pd
spec:
  containers:
  - image: dockerhub.qingcloud.com/docker/nginx
    name: test-container
    volumeMounts:
    - name: html-volume
      mountPath: "/usr/share/nginx/html"
  volumes:
  - name: html-volume
    flexVolume:
      driver: "qingcloud/flex-volume"
      fsType: "ext4"
      options:
        volumeID: "vol-xxxx"
Use PersistentVolumeClaim
The examples above show that, to use PersistentVolume, the volume needs to be created at first, then input volume ID in the configuration file and bind it to a specified service. It is very hard for resource migration because of hard code in the configurations. To solve this limitation, Kubernetes provides PersistentVolumeClaim, which just claims volume needs. Volumen creation and destruction will be handled by Kubernetes automatically.
Define StorageClass:
kind: StorageClass
apiVersion: storage.k8s.io/v1beta1
metadata:
  name: qingcloud-storageclass
  labels:
      addonmanager.kubernetes.io/mode: EnsureExists
  annotations:
      storageclass.beta.kubernetes.io/is-default-class: "true"
provisioner: kubernetes.io/qingcloud-volume
Define PersistentVolumeClaim:
kind: PersistentVolumeClaim
apiVersion: v1
metadata:
  name: qingcloud-pvc
  annotations:
    volume.beta.kubernetes.io/storage-class: qingcloud-storageclass
    kubernetes.io/fsType: xfs
spec:
  accessModes:
    - ReadWriteOnce
  resources:
    requests:
      storage: 10Gi
We already developed QingCloud plugin to support Kubernetes PersistentVolumeClaim. And the plugin qingcloud-storageclass is integrated into the Kubernetes cluster by default, which means end users don’t need any more configurations, so end users can skip setting annotations volume.beta.kubernetes.io/storage-class: qingcloud-storageclass in PersistentVolumeClaim specification, the default fsType is ext4, skip setting annotations kubernetes.io/fsType if no customization requirement. Please refer to the example of wordpress below for more details.
qingcloud-storageclass supports high performance and super high performance volume types, which depends on the resource type of cluster master node when deploying. The storage plugin will create corresponding volumes automatically based on the resource type of master node. That’s the reason Kubernetes App asks to use same resource type when deploying. So if you create cluster with hyper nodes(high performance and super high performance), any pod with mounted volume should be scheduled to worker nodes which resource type is ame as master node.
To use capacity volume, specify storage-class to qingcloud-storageclass-capacity instead of qingcloud-storageclass.
Run the command as follows:
# kubectl get storageclass

NAME                               TYPE
qingcloud-storageclass (default)   kubernetes.io/qingcloud-volume
qingcloud-storageclass-capacity    kubernetes.io/qingcloud-volume
It returns all supported storageclass in cluster. End users could also define their own storageclass.
Note: No matter the volume is high perforamnce or capacity, its acccessModes must be ReadWriteOnce.
Network
Kubernetes on QingCloud uses QingCloud SDN Passthrough solution for container network. The Pods and Kubernetes cluster hosts are in the same VPC, which means they are on the same layer of network, resulting no network performance lost at all. Whenever you create pods, you will see information message about attaching NIC on QingCloud console. However there are some limitations.
- Each host instance supports 64 NICs at most, so we restrict the number of pods on each node to 60.
- Private network (vxnet) is class C subnet, which only supports 253 IP addresses at most. So in order to support a large number of pods, please join multiple vxnets to the VPC when creating cluster.
Tutorial
- Use QingCloud LoadBalancer to deploy Helloworld Service
- Use QingCloud LoadBalancer and PersistentVolumeClaim to deploy Wordpress
More examples
Please find more examples related to the configuration files of QingCloud volume and Loadbalancer from Kubernetes on QingCloud github repository.
# kubectl apply -f xxxx.yaml
Note
- Please don’t set network range to 172.17.0.0/16 for VPC, which is used by docker as default.
- Use same resource type for all kinds of nodes.
- The number of Pods and containers are displayed on the cluster built-in node monitor section on the cluster detailed page of QingCloud console.
- Make sure vxnet could access intenet for calling QingCloud IaaS API and pulling images (Please bind EIP to VPC).
- Please use cluster vxnet just for kubernetes cluster, and use pod vxnets just for pods deployment. Don’t mess them up. Also make cluster vxnet and pod vxnets in the same VPC.
- If end users choose to deploy log nodes and external ELK App cluster at same time by mistake, will use log nodes to manage log data by default, and if external ELK App cluster is deployed and Elastic Search server address is set at same time by mistake, will use exteral ELK App cluster by default.
- Please refer to Kubernetes Official Document for more usage about Kubernetes.
FAQ
How to visit services from outside of Kubernetes cluster
There’re two options.
- Expose loadbalancer through service, and use the loadbalancer of vxnet for the private network case. This is the commonly adopted option, which is recommended to use in production environment.
- Create a router rule to redirect the packages to the cluster ip through any node (including master node) in the cluster. This node acts as the gateway to forward packages for the cluster ip. Please configure DNS if you want to use domain name to access your service. This solution is not recommended to use in production environment.
# ip route add 10.96.0.0/16 via $cluster_node_ip
nameserver 10.96.0.10
search default.svc.cluster.local svc.cluster.local cluster.local
Why my cluster fails to startup or gets timeout
- Make sure an EIP is associated with your VPC.
- Make sure the API key is correct.
Please submit ticket if it still doesn’t work.
Why LoadBalancer doesn’t work properly
- Make sure the Service could be accessed by Cluster IP.
- Make sure the Service could be accessed by NodePort.
- Do not reuse the vxnets where Pods are using if this loadbalancer is in private network.
- Make sure the account get verified (getting ICP license could be better) if end user uses 80 port.
How to output my application logs in json format and be indexed by Elasticsearch in terms of fields
fluent-bit service in Kubernetes On QingCloud already enables the detection of json data, so if the output of log is in json format, it will be added to Elasticsearch index and resolved as json.
Note:
- The whole line of log must be in json format. Some log libaries will append extra information such as timestamps, which makes the log data not in json format. Please print the logs to console by your programming library.
- Please refer to the Hello World Example for more details about log output.
How to customize the logs in Kubernetes
Kubernetes on QingCloud collects logs and stores them in the embeded Elasticsearch service. You can view the logs on the embeded Kibana console. If you want to have more control about your logs, you can configure your own logging server in Environment Settings when deploying the cluster. Currently Kubernetes on QingCloud supports Fluent and Fluent-bit. Please refer to example of fluent-bit, run commands below as reference:
- Log in the client node, start fluent-bit forward server
# cd /opt/kubernetes/sample/fluentbit/ # sh run.sh - Modify the ‘Fluent forward server’ parameter to clientip:24224 in cluster Environment Settings and save it. Fluent-bit agent will be restarted one by one, and the corresponding logs will be shown on the console later on.
Note: Make sure log forward service works correctly if this configuration is enabled, otherwise fluent-bit agent will fail to collect log.
Why log can’t be collected
If you find the logs of the application running on the cluster is not collected by the embedded Elasticsearch service or your customized log forwarded service, it might be there is some problem with fluent-bit agent. Please run the command below to delete fluent-bit daemonset. Kubernetes will re-deploy it automatically.
# kubectl delete ds/fluent-bit -n kube-system
How to use private registry
Kubernetes on QingCloud supports to use private registry.
-
If private registry doesn’t enable https, please set ‘Insecure registries’ in Environment Settings with value being ip:port of private registry when creating Kubernetes cluster.
-
Kubernetes on QingCloud doesn’t support username/password authentication for private registry currently. End users can create secret token on Kubernetes to use his/her own registry account by following the steps below:
- Create secret, modify myregistrykey and myregistryserver
# kubectl create secret docker-registry myregistrykey --docker-username=username --docker-password=password --docker-email=email --docker-server=myregistryserver.com - Configure imagePullSecrets and use the secret created
 apiVersion: v1
 kind: Pod
 metadata:
     name: private-reg
 spec:
   containers:
     - name: private-reg-container
       image: <your-private-image>
       imagePullSecrets:
         - name: myregistrykey
Change History
2.8.1
- Upgrade Kubernetes to 1.10.5
- Integrate KubeSphere express 1.0.0 alpha (kubesphere.io,k8s distribution)
- Add calico network plugin
- Change proxy mode to ipvs
- Fix bugs in volume and cloud controller plugins
- Upgrade helm to 2.9.1
- Upgrade istio to 0.8.0
- Allow to configure docker bridge network
- Add support of nfs client
- Fix the issue that customized ssh keys are removed on client node after restarting
- More minor updates
2.7.2
- hotfix: solve the heapster image pulling issue in private cloud without public network
- Add pre-defined resource group on deployment page, and mark high performance node with node label ‘node’, super high performance node with node label ‘ssd_node’
- Add new cluster environment parameter to customize nodePort range
- Upgrade helm to 2.8.2
- Upgrade istio to 0.7.1
2.7.1
- Allow to use external etcd cluster
- Add helm support as optional deployment component
- Bug fix in volume and cloud controller plugins
- Allow to access all nodes in cluster through client node without password
- Add new cluster environment parameter to limit pods running on each worker node